
|
|
page 3 |
|
Final
Assembly
|
| Cut the 8' long 2x2 as shown at right. | 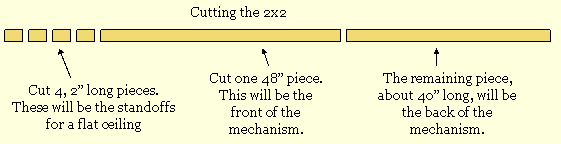 |
| Next, we'll attach the 2" long pieces of 2x2's to the tops of the front and back 2x2's. They'll go about 6" each side of center (12" spacing) on each board. Drill pilot holes up through the front and back boards and into the 2" blocks. Attach with 2 1/2" wood screws. | 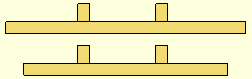 |
|
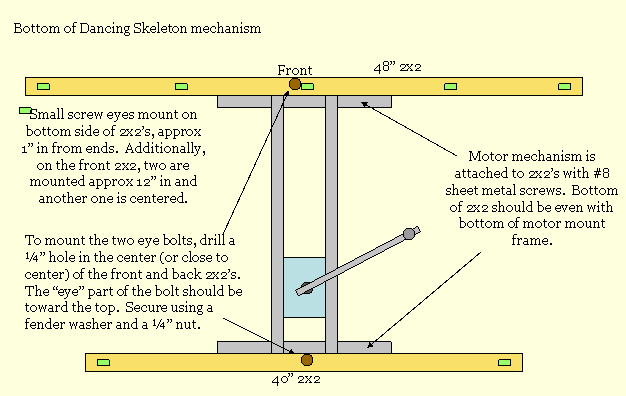
Attach the front and rear 2x2 boards to the motor mechanism as shown at right. Attach the screw eyes and eye bolts as shown. On the front board, the outside and center screw eyes will be used as guides for the sliding pieces of fishing line that make the skeletons move. The other two screw eyes are used for hanging each skeleton. The screw eyes on the back board are used as guides to route the fishing line to the outside front screw eyes as shown below. |
 |
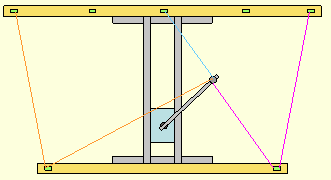 |
The drawing at left shows the routing of the three pieces of fishing line. After it passes through the front screw eyes, leave enough hanging for attachment of the skeletons as shown below. |
| Before mounting the dancing skeleton rig to the ceiling, you'll need to wire up the motor. I recommend wiring it for low speed operation by attaching wires to the "low speed" and "common" terminals as shown at right. Note that part of the plastic housing has been cut away for easier access to the terminals. Soldering is the most reliable method of wire connection. For more info, see my Wiper Motor Pages. |  |
|
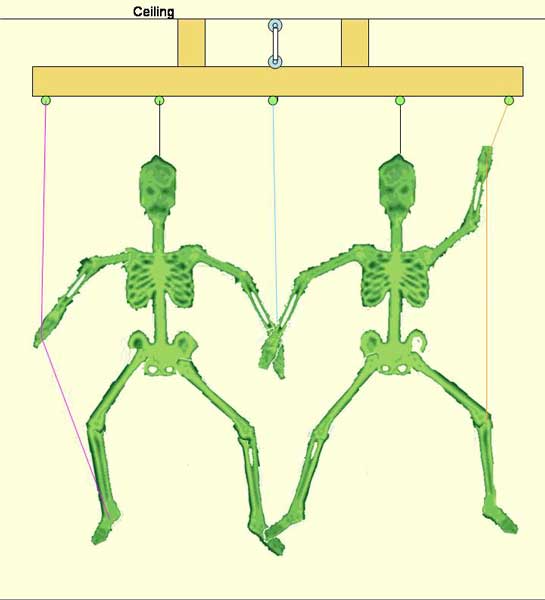
For mounting to the ceiling, you'll need to screw the large screw eyes into something solid in the ceiling, probably a ceiling joist. Please be aware that just screwing them into drywall or plaster without solid backing will not work and you risk the high probability that the rig will fall and injure someone. To fasten the dancing skeleton mechanism to the ceiling, align the large screw eyes in the ceiling with the eye bolts on the rig and fasten the two together as shown at right. I use heavy duty tie wraps (zip ties or cable ties), using two per mount for security. You could also use heavy wire or strong cord. Mount the skeletons to the rig using small pieces of fishing line tied to the two screw eyes either side of center and through the small hole in the top of the skeleton heads. Attach the lines that come from the rotating mechanism to the arms and legs as shown at right. You'll have to experiment with this step to see what works best for you. Add the fishing weights to the ends of the lines to help pull them down. |
 |
|
OK, it's time to hook the motor up to a power source and try it all out. I wish I could tell you the exact voltage (and therefore motor speed) you'll need, but the motion of the skeletons is dependent on the length of the fishing line used and every set-up is going to be a little different. I can tell you that hooking the motor directly to a 12 volt source will make things go too fast and the skeletons will be out of control. I use an 12 volt power supply along with a motor speed controller (Amazon has them). This allows me to fine tune the speed for the best effect. Whatever power supply you decide to use, it should put out at least 2 amps. The supply should be hooked to the motor so that the crank rotation is clockwise when viewed from below. This will tend to tighten the nut holding the arm. If it rotates in the wrong direction when you first try it, simply reverse the wires to the power supply. Now, it's time to plug in that black light, put on some Monster Mash and let those skele's have a blast. |
| Halloween Home | last update 11/2019 |