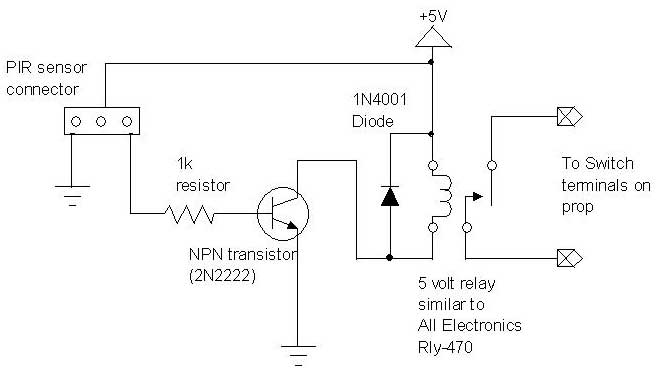
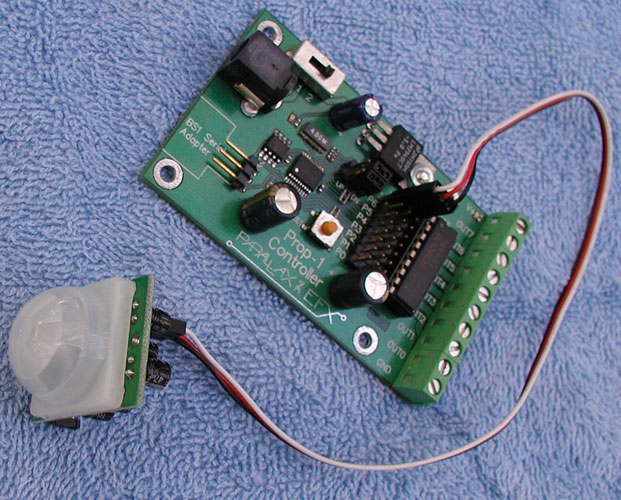
Report on the Parallax PIR sensor by Scary Terry

Available from EFX-TEK and Parallax.


This is a brief report on the Parallax PIR sensor. PIR stands for Passive InfraRed. In simple terms, it's a motion detector. The Parallax site has more details on how it works. These are my observations from testing one unit, your results may vary.

As you can see, it's fairly small.


It's intended to be used with a microcontroller but it can be used independently (see below). 
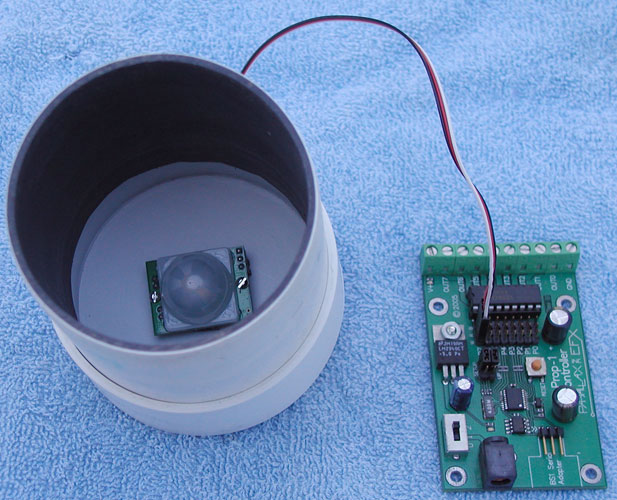
Here it's shown with a EFX-TEK Prop-1 controller.

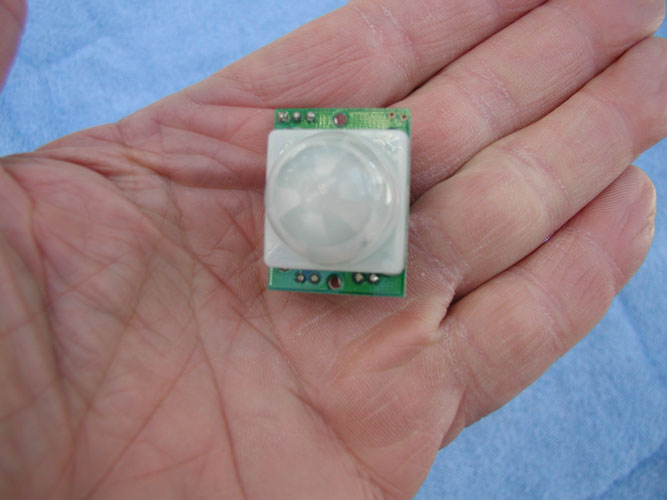
I found the sensitivity of the unit to be very good, responding immediately to any but the slightest body movements while standing about 10 feet in front of it. My unscientific testing found the useful angle to be about 45 degrees either side of center for a total of 90 degrees.

In the Parallax documentation, they talk about a calibration period of from 10-60 seconds after power is first applied. I found this to be the case, as in the first seconds of operation, the output is continuously turning on and off. I found it best to turn it on and leave the room for about a minute. When writing a program for this sensor, you probably want to take this into consideration so your prop is not cycling during this time.

The unit output is high whenever there is motion detected. If the motion is continuous, the output remains high. After motion stops, the output remains high for from 2-4 seconds.


Jon Williams, of EFX-TEK, suggested that to control the angle of sensitivity, the sensor could be mounted in a PVC end cap and an appropriate length of PVC fitted to control the angle. I tried this using a three inch end cap as shown at left. The first thing I discovered was that the mounting holes on the circuit board are very small and require nothing larger than a 2-56 screw. There's really no room to drill out the holes any larger without damaging the circuit board. I also found that if you want to use a three pin servo type connector, you'll probably need to drill a hole in the cap to accommodate this connector as shown at right.

In mounting the sensor, you should probably use plastic standoffs (the circuitry comes right up to the holes, so metal standoffs could cause problems), see the updates below for ideas on standoffs. I didn't use any standoffs and it seems to work OK, positioning the sensor at just a slight angle. If you try this, be careful not to tighten the screws too tightly and damage the board.

Update 9/06 I just got an email from Randy R. who recommends using old plastic pen cartridges (like from a Bic pen) cut to the proper length as standoffs. He says that they're the perfect size for fitting over a 2-56 screw. What a great idea!


Here's the sensor with a 3 1/2" tube attached. The tube dramatically reduces the angle of sensitivity. The sensor will only trigger if it can see the motion, meaning that the tube effectively eliminates triggering from the sides. This is useful in controlling when a prop is triggered. At right is another view of the cap with a 3 1/2" tube.

  For mounting, I made a simple bracket out of 3/4" aluminum stock, bent as shown above left. I attached it to the end cap using screws and wing nuts. It can then be mounted to a surface using just one screw, which gives it the ability to pivot as well as tilt up and down for precise aiming.  


Here's a simple stand-alone circuit for the PIR sensor.

(Note: as of 8/09, the Rly-470 is no longer listed on the All Electronics website but they have several other 5 volt relays that will work fine.)


      Halloween Home last update 11/2019